https://blueberry-kyu.tistory.com/11
3. 학습
학습을 하기 위해 필요한 파일은 3가지입니다
1. DATA 파일
2. cfg 파일
3. weights 파일
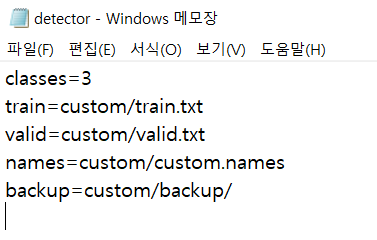
DATA 파일의 내부는
classes= 3 (클래스 개수)
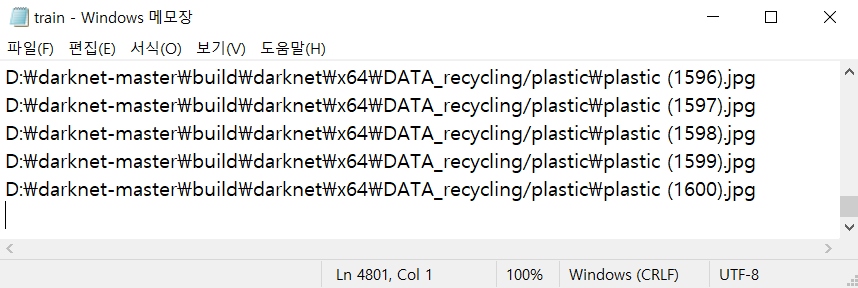
train=custom/train.txt (학습 데이터 경로가 들어있는 텍스트 파일)
valid=custom/test.txt (검증 데이터 경로가 들어있는 텍스트 파일)
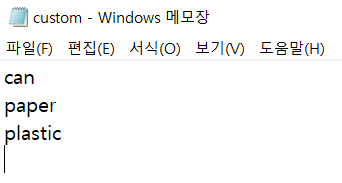
names=custom/custom.names (클래스 명이 적혀있는 파일)
backup=custom/backup/ (학습 시 백업 데이터가 저장되는 경로)
와 같이 이루어져 있는데
그중 train, test, names 파일을 만들어줘야 합니다
먼저 이전 포스트에서 만들어둔 YOLO_Formatted 폴더를 원하는 이름으로 바꾼 후 darknet-master\build\darknet\x64 안에 넣어줍니다
그 폴더 안에서 다음 코드를 실행해 줍니다
import os
import glob

classes = []

def createFolders(root):
    try:
        os.mkdir(root + '/custom')
        os.mkdir(root + '/custom' + '/backup')
    except:
        return
    return


def classesList(root):
    try:
        for file in os.listdir(root):
            if os.path.isfile(os.path.join(root, file)) == False:
                classes.append(file)
    except:
        return
    return

def createNames(root, file):
    try:
        fileName = open(root + '/' + file, "w")
        for name in classes:
            fileName.write(name + '\n')
    except:
        return
    return

def YOLOdataset(wd, root, ratio):
    try:
        fileTrain = open(root + '/train.txt', "w")
        fileValid = open(root + '/valid.txt', "w")

        for index in classes:
            labelDir = wd + '/' + index
            labelList = glob.glob(os.path.join(labelDir, '*.txt'))
            imageList = glob.glob(os.path.join(labelDir, '*.jpg'))
            count_train = int(float(len(labelList)) * ratio)
            count = 0

            for label in labelList:
                name, extension = os.path.splitext(label)
                imagelabel = name + '.jpg'
                if imagelabel not in imageList:
                    print('false : '+imagelabel)
                    continue
                if count < count_train:
                    fileTrain.write(imagelabel + '\n')
                    print('train : '+imagelabel)
                else:
                    fileValid.write(imagelabel + '\n')
                    print('valid : '+imagelabel)
                count = count + 1
    except:
        return
    return

def YOLOdatafile(root):
    try:
        file = open(root + '/detector.data', "w")
        file.write('classes=' + str(len(classes)) + '\n')
        file.write('train=custom/train.txt' + '\n')
        file.write('valid=custom/valid.txt' + '\n')
        file.write('names=custom/custom.names' + '\n')
        file.write('backup=custom/backup/' + '\n')
    except:
        return
    return


wd = os.getcwd()
x64 = os.path.dirname(wd)
createFolders(x64)
classesList(wd)

Dir = x64 + '/custom'
createNames(Dir, "custom.names")
YOLOdataset(wd, Dir, 0.8)
YOLOdatafile(Dir)
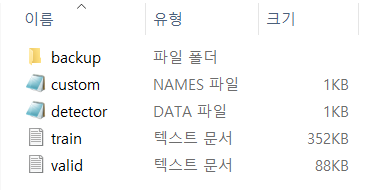
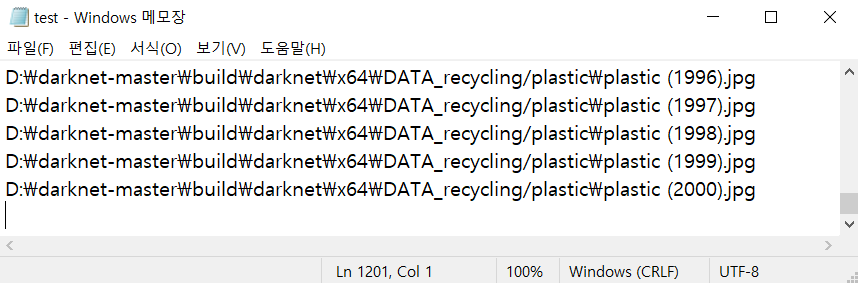
실행하셨으면 darknet-master\build\darknet\x64 폴더에 custom 폴더가 생성되고 custom폴 더안에 backup 폴더, names 파일 data 파일, train.txt, test.txt가 생성되어 있을 것이고 각각의 파일들의 상태는 다음과 같습니다
cfg파일은
먼저 오리지널 cfg파일을 다운로드합니다
https://raw.githubusercontent.com/AlexeyAB/darknet/master/cfg/yolov4-tiny.cfg
저는 yolov4-tiny.cfg을 사용하였습니다
cfg 파일을 메모장으로 열고 저희가 사용하는 custom data에 맞게 수정해 줍니다
batch = 64 [기본값 64]
subdivisions = 4 [기본 값 8]
한 번에 batch만큼 처리하고 batch를 subdivisions만큼 나누어 처리합니다
batch는 클수록 subdivisions는 작을수록 빠르지만 많은 GPU memory가 필요합니다
train 시 out of memory 가 뜨면 subdivisions를 올려봅시다 (8, 16...)
height = 416
width = 416
32의 배수여야 하며 416과 608을 많이 사용합니다
max_batches = 6200 [클래스 개수 * 2000 + 200??]
iterations 수
2000 대신 3000, 4000을 곱하기도 합니다
+200 하시는 경우가 많은데 이유는 잘 모르겠네요..??
steps = 4800, 5400 [max_batches * 0.8, max_batches * 0.9]
해당 step에 도달 시 learning rate를 scale 만큼 재조정합니다
classes = 3 [클래스 개수]
yolo 레이어에 있습니다
yolov4-tiny 기준 총 2개 (yolov4는 3개)
filters = 24 [(클래스 개수 + 5) * 3]
yolo 레이어 바로 위인 convolutional 레이어의 filters를 수정합니다
yolov4-tiny 기준 총 2개 (yolov4는 3개)
anchors = 기본 값 사용
darknet.exe detector calc_anchors DATA파일 -num_of_clusters 9 -width 416 -height 416을 실행하여 계산된 값 (anchors.txt가 생성됩니다)을 입력합니다
default로 설정돼있는 값을 이용해도 큰 차이는 없는 듯합니다
random = 0 [or 1]
1로 설정한다면 height, width의 값을 다른 여러 값으로 바꾸면서 진행합니다
(저는 608 사이즈에서 out of memory가 발생해서 안 했습니다)
전부 완료했다면 원본 cfg와 헷갈리지 않게 파일명을 바꾸고 저장합니다
weight 파일
https://github.com/AlexeyAB/darknet/releases/download/darknet_yolo_v4_pre/yolov4-tiny.conv.29
yolov4-tiny.conv.29을 다운로드합니다
진짜 학습하기
이제 다 왔습니다
cmd 상에서 build\darknet\x64에 진입 후 다음 명령어를 실행해 줍니다
darknet.exe detector train custom/detector.data custom/yolov4-tiny-custom.cfg custom/yolov4-tiny.conv.29
(darknet.exe detector train DATA파일경로 cfg파일경로 weight파일경로)
~~
~~
~~
~~
4. 결과 확인
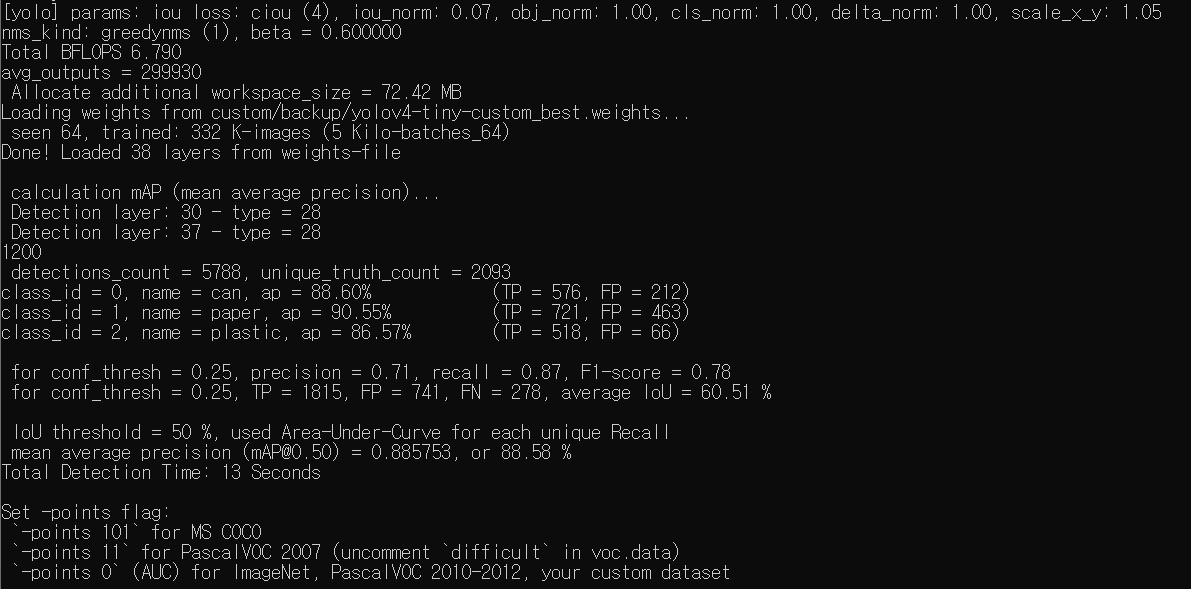
학습이 완료되었으면 map를 확인해봅시다
darknet.exe detector map custom/detector.data custom/yolov4-tiny-custom.cfg custom/backup/yolov4-tiny-custom_best.weights
(darknet.exe detector map DATA파일경로 cfg파일경로 학습된weight파일경로)
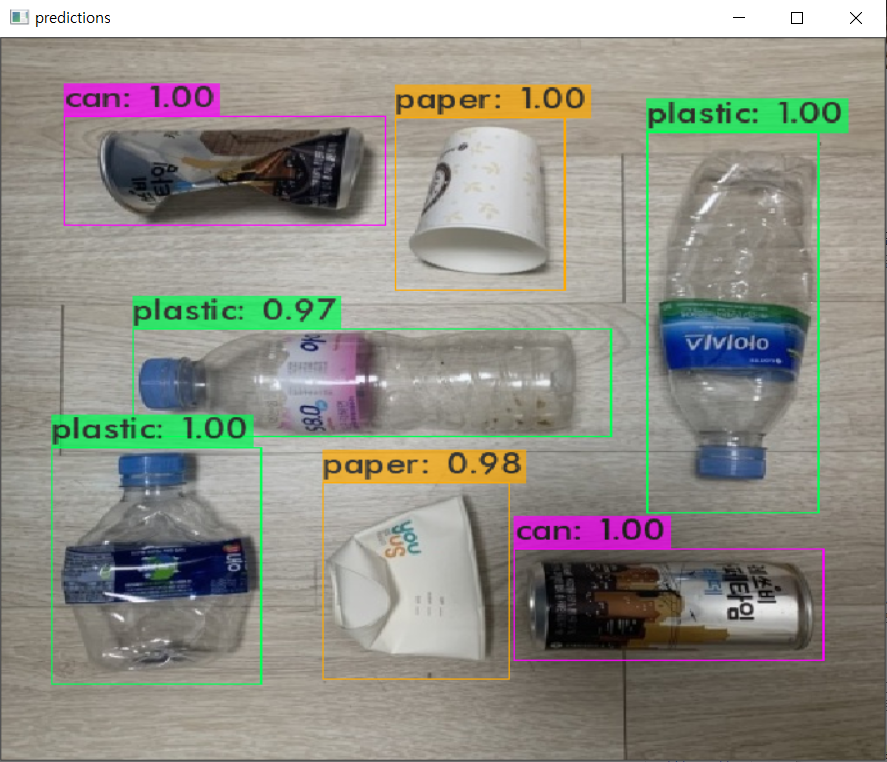
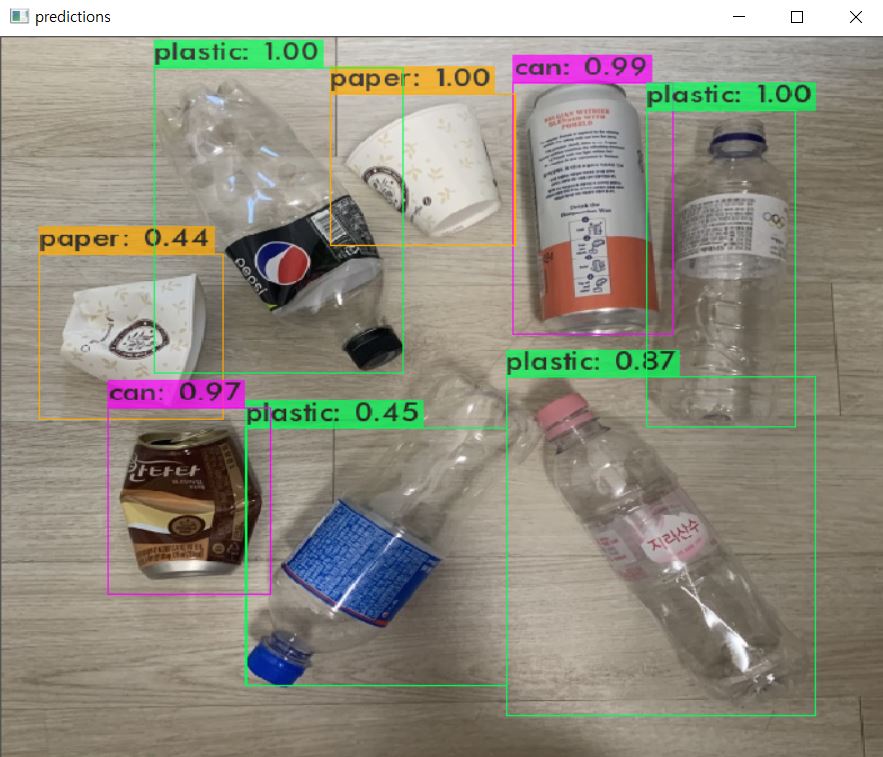
이번엔 실제 사진으로 test 해봅시다
darknet.exe detector test custom/detector.data custom/yolov4-tiny-custom.cfg custom/backup/yolov4-tiny-custom_best.weights test/test01.jpg
(darknet.exe detector test DATA파일경로 cfg파일경로 학습된weight파일경로 사진파일경로)
동영상 파일을 확인하고 싶다면
darknet.exe detector demo DATA파일경로 cfg파일경로 학습된weight파일경로 동영상파일경로
(-out_filename 파일명.avi 으로 저장 가능)
웹캠으로 확인하고 싶다면
darknet.exe detector demo DATA파일경로 cfg파일경로 학습된weight파일경로
참조
https://github.com/kiyoshiiriemon/yolov4_darknet
https://webnautes.tistory.com/1423
http://daddynkidsmakers.blogspot.com/2020/05/yolo.html
https://naloblog.tistory.com/69
https://wingnim.tistory.com/56
https://ultrakid.tistory.com/17
https://velog.io/@springkim/YOLOv2
https://www.ccoderun.ca/programming/2020-09-25_Darknet_FAQ/
'딥러닝 > YOLO' 카테고리의 다른 글
| custom data를 이용한 YOLO 학습 (1/2) (0) | 2021.08.17 |
|---|---|
| Windows10 darknet 설치하기 (0) | 2021.08.14 |